2. Messages
Let us create our first message with the help of AB Bulk Mailer software:
- First of all click on "Messages" icon from the homepage of this software.The system will display below shown window:-
- Here you can create a new email message by making use of different features of this software, below shown screen displays the main subject and main body of a sample message created for you .Apart from that it also displays other functions like rotating subjects and bodies, attachments, an option for incorporation of various hyper links, font style and size, font colors and various alignment tools etc. You can also add multimedia files for high quality deliverance of your mails.

- May be you want to change HTML yourself for the message. To do so check the HTML view box and after getting your email message in editor form you can edit it in your own way and check the design view of it there only. Below shown screen shows the design view of your email i.e how your looks like after being designed.

- If you want to view your email in html mode for further editing or want to personalize it in your own way, then you need to simply check the HTML view checkbox or simply select the 'transfer data from editor' after clicking on the square box to the right of HTML view checkbox as shown below and you will get your mail in HTML or editor form. Apart from that you can also locate missing images in your code by simply clicking on the 'locate missing images' as shown below.

- You can also clean HTML , clean MS office HTML, and also you can convert your mail into simple text here only by clicking on EDIT from Menu bar.
- You can also run spam checker and identify the spamming words from your message body so that you can remove them in order to prevent your mails from going into spam box. You can also duplicate your message. Both these options can be accessed after clicking on Features from Menu bar.
- You can add pictures to email message and can create clickable links and pictures.You can select some text or image with which you want to associate your link such that when user clicks on that text/image it connects the user directly to your link/webpage that you inserted in your mail. So after selecting your respective text/image then click Hyperlink from toolbar.After clicking on "hyperlink" icon a small slide appears on your screen where you can enter your link/webpage to be inserted in your mail. After entering the link, hit 'ok' and your link will be inserted in the mail.
- To insert images and substitutable items like receivers email id, contact name, or any other field say field 1 to7 etc what so ever information you want to insert,click on Insert menu. For example, to insert email of "recipient" add [emailAddress] to your subject or body. This will automatically grab and insert email of receiver when you send mails. This way you can make mails unique and ensure 100% inbox rate.

- You can insert email address of receiver from your contacts info etc, by putting the [emailAddress] in mail subject/body. It will automatically insert the respective field information which it does by collecting the data from your corresponding contacts that you imported from say your excel sheet.For example, you can import field 5 of a contact(check contacts screen) by putting [field5] in subject/body,so on.
A typical mail may be like:
It is a pleasure to [field2] with [field3] having [field4]
of [field5] and address [field6] . calling back with [field7]
President - Company XYZ.
Visit our website at http://www.company.com
203 New Jersy LA
Telephone 1234567
Unsubscribe from this newsletter at http://www.companyxyz.com/unsubscribe
This mail was sent at [SENDINGTIME] to [emailAddress].
ticket number [randomnumber]
Disclaimer: The CAN-SPAM Act of 2003 (Controlling the Assault of Non-Solicited Pornography and Marketing Act) establishes requirements for those who send commercial email, spells out penalties for spammers and companies whose products are advertised in spam if they violate the law, and gives consumers the right to ask mailers to stop spamming them. The above mail is in accordance to the Can Spam act of 2003: There are no deceptive subject lines and is a manual process through our efforts on World Wide Web. You can opt out by sending mail to email id mention here and we ensure you will not receive any such mails.
NOTE: In this case [randomnumber] will be substituted with 8 digit number and hence making every mail of yours unique by preventing your bulk mails from getting marked as spam or from getting bounced, [SENDINGTIME] is time at which email is sent, [contactName] will contain recipient's name. *Note these details are to be entered in "contact" screen which can be imported from excel sheet.
How to rotate message subjects and message bodies:
- The most unique inbuilt feature in AB Bulk Mailer software is its ability to give every other email a unique subject followed by unique body that prevents you from falling into the traps of spam filters. AB Bulk Mailer allows you to enter 30 different subjects and 50 email bodies which will get rotated automatically after every emails that is sent. When you set the main subject of your email message then this software gives you the choice where you can either set the default subject as your rotational subjects by making some slighter changes to make them unique or you can specify all your 30 subjects the way you want them to be as shown below. This means every sent mail is unique which has a different message subject, different body and hence ensures highest inbox rate. It is a good practice to insert sending time, or a unique number, custom fields(1-7), in message bodies and subjects in order to make your emails unique.
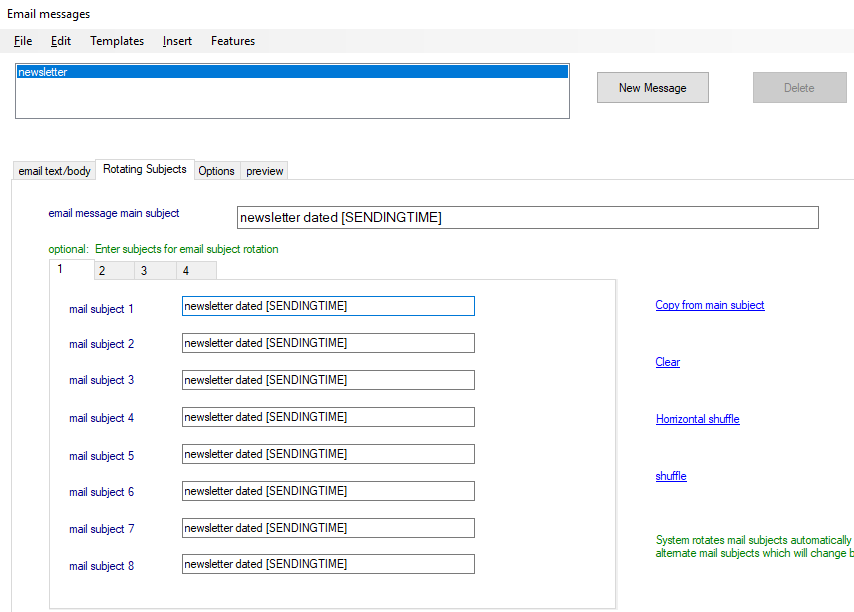

- It is recommended that you enter multiple subjects and multiple bodies for every other mail that is to be sent. Do as many as you can. Entering all subjects and mail bodies is not necessary.Once the software starts sending emails it keeps on rotating the email subject and email body, providing every sender email with a unique email subject and unique email body.So when the process of bulk mailing begins, subject rotation commences with every email sent. Hence AB Bulk Mailer ensures you with the highest inbox rate with multiple rotating subjects and bodies.
- Spintax is a simple code or syntax used to submit random alternating words, sentences, phrases and numbers or simply used to spun the words. For example if you want your classified ad submitter to alternate titles or to be more specific you want to alternate each subject of your email,then you have to put your titles in this format: {title1| title2| title3}. Below shown example makes it more clear for how to use subject spintax in AB Bulk Mailer.
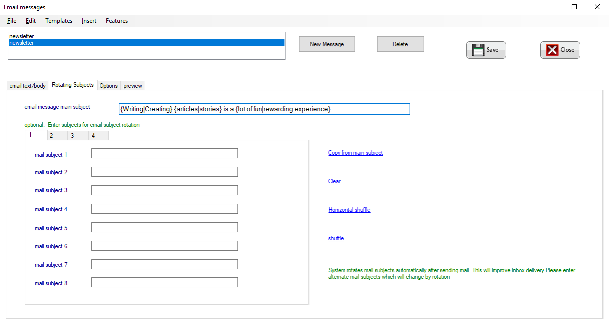
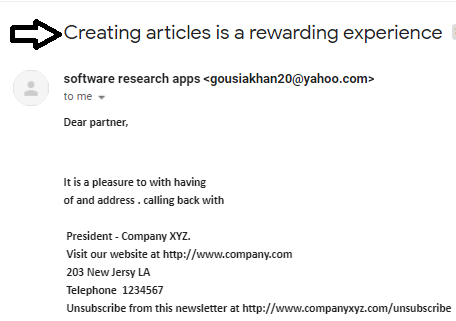
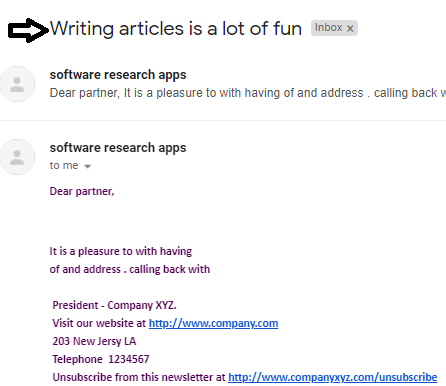
- In the below shown screen, you can clearly differentiate how enabling subject spintax keeps on spinning or alternating the subject of the same email, every time you send it. So, this is another way of making your email subjects unique, hence guarantees you the safe deliverance of your emails into user's inbox. The same spintax method can be used in your email body in order to send each mail of yours in a unique way.
- AB Bulk Mailer provides you with various free email templates. This Software comes with many built-in templates. These templates have been created to make your work much easier and appealing, more importantly gives you an idea regarding the creation of a professional email. Each template is of different category and you can choose what suits your campaign. These templates have been designed with some custom fields which gets automatically inserted with every email sent.You can also create your own templates.You can import mail templates from your computer or any website after entering the URL of that website as shown below. After selecting a suitable template for the campaign, you can then personalize your emails for the best results. You can also import HTML template here by clicking on File> Import HTML template by simply browsing it.


- The software allows you to save your templates on your computer and also modify them. You can import and modify templates from any website and then use it.
How to tracks emails:
- With AB Bulk Mailer you can also track your emails. For that go to messages from the main screen and click on features from menu bar. The first option that appears on your screen is 'tracking emails'.
![]()
Email tracking is practically not recommended as it affects inbox delivery. You can track emails practically if you insert image in message.You may click Message -> features from menu ->tracking emails. It shows you how to track emails. Typically you need to click 'get tracking files for upload'. It will then show you some php files and upload it on your website. For php based website's, only you need to change user id and and password for database in php files and create a table in mysql database with below script:-
 CREATE TABLE `opentracking` (
  `eid` varchar(64) NOT NULL DEFAULT '',
  `ipaddr` varchar(16) NOT NULL DEFAULT '',
  `atime` timestamp NOT NULL DEFAULT CURRENT_TIMESTAMP ON UPDATE CURRENT_TIMESTAMP
) ENGINE=MyISAM DEFAULT CHARSET=latin1;
Then you need to upload getPicture.php and view.php to your website. Then in your message , at any place, type below:-
<img src="http://yourwebsite.com/getPicture.php?eid=[emailAddress]">
Then type http://yourwebsite.com/view.php . It will show you something like below:-
| email address | ip address | time |
|---|---|---|
| abc@gmail.com | 10.0.2.5 | 1/1/2020 12AM |
If you are using non-php website's like jsp or asp.net website's,you can create the above table in your database and then create proper files keeping getPicture.php and view.php as reference. Basically you need to convert code from one scripting language to another. For further details visit tracking your bulk mailing response.
Please check the video which shows how tracking works. You may analyze your campaigns with google analytics instead of using the above approach.
How to schedule emails:
- AB Bulk Mailer has an inbuilt email scheduler where you can also schedule your emails for future and set the date for their deliverance following which the mails will be then sent automatically after the set date is reached. For that follow the below mentioned steps.
- Go to Messages-> Options. Click "schedule emails" > Set "schedule date" and "schedule time" > select the contact group(group that contains your target emails which you created in contacts screen) to which scheduled message will be sent. Click Save button at bottom.

- When the scheduled time reaches mail goes automatically.You can schedule multiple messages, each can have its own details and scheduling policies ."Repeat every" shows when to send the message repeatedly. If you select it, and for instance keep it 20, this means that the mail message will be sent to selected contact group after 20 days, provided the computer is set on and schedule checkbox is enabled. Once a scheduled mail goes, you can check it in dashboard.

- You can also add file attachment to mails with embedded images. Although adding attachment is not recommended as it effects inbox rate, but you still can attach files by clicking on options > Attach Files.
- As you can see above, you can attach any number of files to the message that you want to send. You can also enable spintax for your messages so that different sentences are spinned automatically with every mail sent. Do not enable spintax syntax if you are not able to understand what it is. You may preview the expressions created for the purpose of understanding by clicking the blue hyperlink below the spintax checkbox.
* You can enter 'friendly name' for a newsletter above just for memorization only, there is no other use for it.
How to add unsubscribe link:
- Keeping the unsubscribing button available after user sign up is always a good practice for successful marketing platforms, if the unsubscribe button is not available you will be marked as spam, forcing the spam filters to block you leading to a drop off in the number of subscribers.So making the unsubscribe button visible where subscribers are used to looking for it increases the efficiency of your marketing campaign. So in order to make your work easier Un subscription is automatically handled in this software.It is inherently attached to sending email and is usually hidden.Still may be you want to add extra level of un subscription option, follow below given steps:
- Click Insert menu from toolbar -> click on 'unsubscribe link' and enter your unsubscription link in the box that appears on your screen.
OR
- Click on "insert email unsubscribe link" . It will insert the unsubscribe link to message body. You can put it any where, whether in subject or in the body of the message after you enter a value in given link box as shown below, that will be used for automatic un subscription which is used internally by the software and will not be visible to you. Optionally, though not required, you can also insert it to mail body.
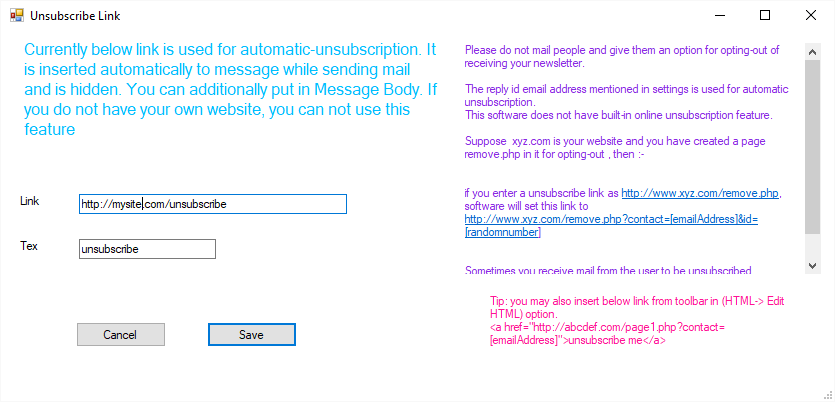
 Optionally,you can directly insert any of below links in HTML menu -> edit HTML.
 <a href="http://abcdef.com/page1.php?contact=[emailAddress]">unsubscribe me</a>
 replace abcdef.com by your website url
    or
 <a href="mailto:globalmarketing@gmail.com">To stop getting mails </a>

So best thing to know is, if you have a link in your message like
 http://abcdef.com/page1.php?contact=[emailAddress], when mail is sent,
software substitutes [emailAddress] by recipients' email,
and when user clicks on it, the email to be un subscribed
is passed to your the link, may be like
http://businessmarketing.com/getResponsed.php?contact=god@bluesky.com.
So if user clicks the link http://abcdef.com/page1.php?contact=[emailAddress], software passes value of email address as the contact parameter which can be processed at your website end.
If you still can not understand it, enter a value for the Link and in Message Body insert a simple link with text unsubscribe and pointing to your website.
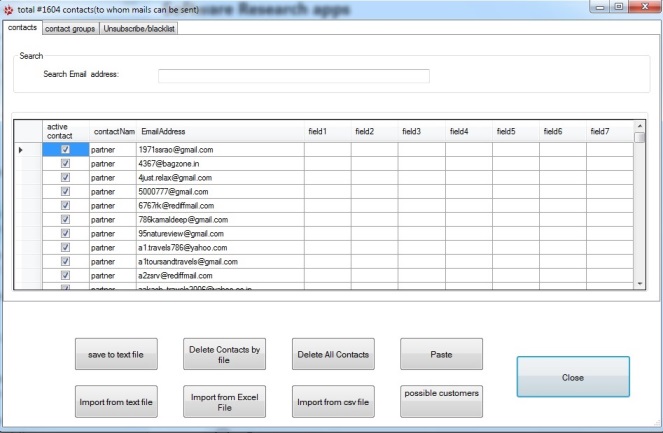
The above screen shows the email addresses to which you can send emails or to be very specific your targeted leads.You can add as many as email addresses that you want here either typing them one by one, or importing your leads from excel, notepad text files.Duplicate or invalid emails addresses are automatically omitted, hence this software helps you in finding and generating a valid and genuine list of customers. Apart from that you can create personalized emails using this software while keeping in view the interests of your customer. This software allows you to break your contact list in various groups and by using the user's data you have collected you can create a unique segment based on that data and personalize your emails in the best possible way .You can have one group active one at a time and mails can be sent to active contacts only contained in that one group i.e. whose 'active' value is checked (active value explained below in detail in 'contact groups').
- If you already have your contact list generated in a file say "excel" you can import them back to software in order to create a contact list to whom you want to send your emails. To import from excel or csv file ,click on "import from excel" or "import from csv file", a slide appears on your screen like shown below:-

- For instance if you import your leads from Excel then you need to enter respective index number of multiple fields to be imported from excel sheet.Suppose if email is contained in 5th column in excel sheet, then in order to import it from excel file you need to enter index as 4 here in the slide shown above, So the value to be entered is actually one less than column number in excel sheet.If you still find any difficulty in assigning a correct index number then click on "help on finding indexes" it will help you in finding the corresponding index value of any of the fields.
You can import any or all the fields of an excel sheet and they can be later inserted into the mail subjects and bodies in messages.
- You can also make each email unique and personalize it to each contact using personalization custom fields, where you can store any type of values in field1, field2.... field7. It can contain any information like address ,names, ssn, age, invoice, amount or any other relevant information.
For example, if you insert field1 it can hold and infix the phone number of the person to whom you want to send emails. These fields are included automatically in your mails after importing them from excel file.The advantage of using these fields is that they can be inserted into a dynamically created message. These fields can be inserted in Messages->Insert menu -> Custom Fields.
*NOTE:- You need to enter 786 as the value of index field that you do NOT want to enter from excel sheet.
Contact groups:
- Putting and sending too many email addresses in the software altogether can unnecessarily slow down the software. For that AB Bulk Mailer comes with a solution where you can use contact groups. You can create groups by dividing the total number of emails in various categories that improves your sending speed and quality.Say you have 100K emails,you can create two groups of size 50K each. This way you can achieve best performance. The contact group size recommended is 30,000 emails. There will be one active contact group at a time, so you can click on any contact group that you want to use for the purpose of mailing like BM, Project Manager etc as shown below,to set it active. . You can have "n" number of groups.
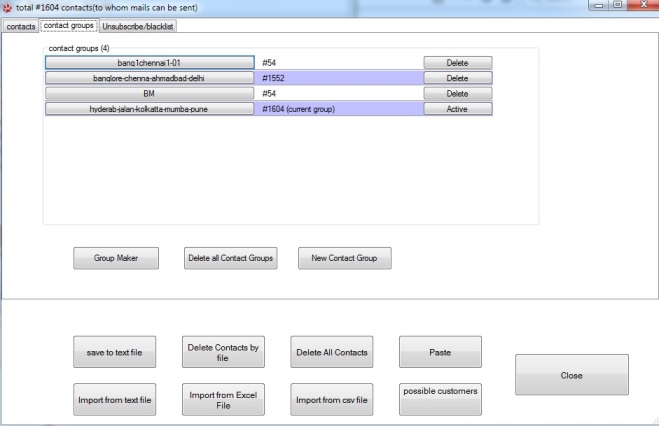
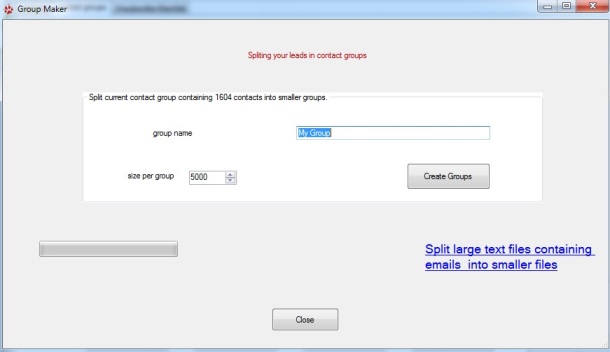
- Group maker allows you to automatically create manageable lead groups in the software. It also includes a splitter that splits large text files containing emails into smaller files and creates manageable list of user-defined size which can be imported back into the software. Please note, as long as you use contact grouping features there is no limit for the number of leads to be added in AB Bulk Mailer. If you have kept all the contacts in a single group,clicking contact group automatically takes you to a wizard where you can split you contact list into groups.
- Paste button:- Clearly one can see on the same screen of "contacts", a 'paste' button is available there that can help you in importing your contacts with simple copy and paste method. Say you are on some web page or have a word, excel or any file open from where you want to import your leads, you can copy and paste those emails by simply copying them and clicking Paste button in contacts screen of AB Bulk Mailer. For excel you can select entire column and click copy and then paste them in contact's window .
- "Delete Contacts by file":- Apart from the option "delete all contacts". This software allows you to delete a text file containing emails which you want to delete all at once by clicking on "Delete Contacts by file".
- Centralized unsubscribe/blacklisted emails: The software lets you to unsubscribe an email address or even to maintain a handy blacklisted or bounced emails as shown below. This way your mailing campaign is carried out successfully and prevents you from getting flagged as spammers. With AB Bulk Mailer you can delete the blacklisted emails from all contact groups any time by clicking on "delete all blacklisted emails" button. You can directly paste your blacklisted emails in the box shown below:-
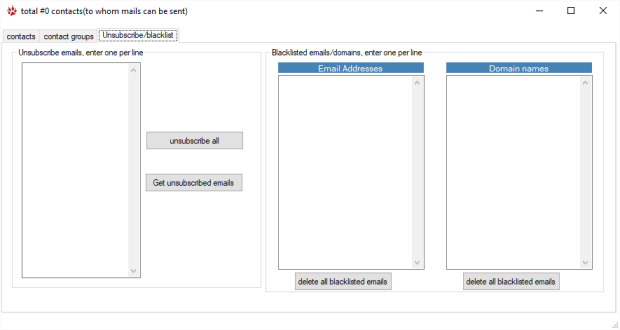
- You can clear the blacklisted emails, shown in pink box above, any time, by right clicking on the box, then click on "Select ALL" after right clicking on the list, and pressing "delete" key from keyboard. You may also clear it normally as in a text editor like in Word or Notepad. Please note centralized blacklisting feature is for your help, and typically in email verifier screen, when you add some emails to blacklist, you can delete them here. You can clear the box as many as times as you want.
Clicking 'unsubscribe' button in 'contact' icon above actually searches the email and marks the non existent emails as inactive in contacts screen. Clicking 'Get un subscribed emails' above shows a list of in-active emails. Please note that emails can be sent to active contacts only.